

This tutorial shows how to build a SAMSON Extension on Windows using Microsoft Visual Studio (MS VS).
Requirements
If you have not installed the SAMSON SDK, please, follow the instructions from the Installation of SDK section.
- CMake v.3.10+
- Qt6.5.2 (download Qt: https://www.qt.io/download), add the path to Qt dll libraries into the system Path environment variable
- Visual Studio 2019 Community or Professional, or a newer version (VS 2022).
- QtCreator (should be available when you install Qt) is necessary if you want to modify Qt forms.
Configuration of a project in Microsoft Visual Studio
Once CMake is installed, generating a project for your development environment is straightforward. In this tutorial, we will show how to configure a project for a SAMSON Extension in Microsoft Visual Studio (MS VS) 2019+ using CMake for generation of VS project and solution from the command line.
Note that Microsoft Visual Studio 2017 has introduced a built-in support for handling CMake projects - you can create a CMake project with taking into account the information provided below.
Let's assume that Qt is installed in YourQtPath (i.e. the folder which contains the Qt6.5.2 folder) and the SAMSON SDK is installed in YourSDKPath/SAMSON-Sdks/5.0.1/ (i.e. the folder which contains the following sub-folders: cmake, include, libs, SAMSON-Debug).
Note: By default, SAMSON and its SDK are installed into C:\Users\USERNAME\OneAngstrom\.
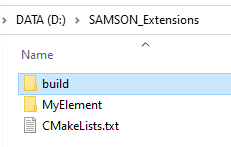
Go to the folder where your SAMSON Extension is stored. Open a command window from within the build folder ( Shift + right click on the build folder and choose Open PowerShell window here in the context menu), if there is no build folder, create it.
In the PowerShell, execute the following command for the version of Visual Studio you have:
- for Visual Studio 2019: cmake -DSAMSON_SDK_PATH="YourSDKPath/SAMSON-Sdks/5.0.1/" -G"Visual Studio 16" ..
- for Visual Studio 2022: cmake -DSAMSON_SDK_PATH="YourSDKPath/SAMSON-Sdks/5.0.1/" -G"Visual Studio 17" ..
The -G designates the cmake generator, to check the available ones execute cmake -h in the terminal.
Note: If you have not specified the QT_CMAKE_INCLUDE_DIR during the SAMSON SDK Installation procedure, you will need either to add the QT_CMAKE_INCLUDE_DIR environment variable (the path is specific to the Visual Studio version you are using) or specify it in the previous cmake command by adding -DQT_CMAKE_INCLUDE_DIR:
- for Visual Studio 2019: cmake -DSAMSON_SDK_PATH="YourSDKPath/SAMSON-Sdks/5.0.1/" -G"Visual Studio 16" \-DQT_CMAKE_INCLUDE_DIR="YourQtPath/Qt/6.5.2/msvc2017_64/lib/cmake" ..
- for Visual Studio 2022: cmake -DSAMSON_SDK_PATH="YourSDKPath/SAMSON-Sdks/5.0.1/" -G"Visual Studio 17" \-DQT_CMAKE_INCLUDE_DIR="YourQtPath/Qt/6.5.2/msvc2019_64/lib/cmake" ..
For example, for my installation to build a project for Visual Studio 2022, I used the following command:
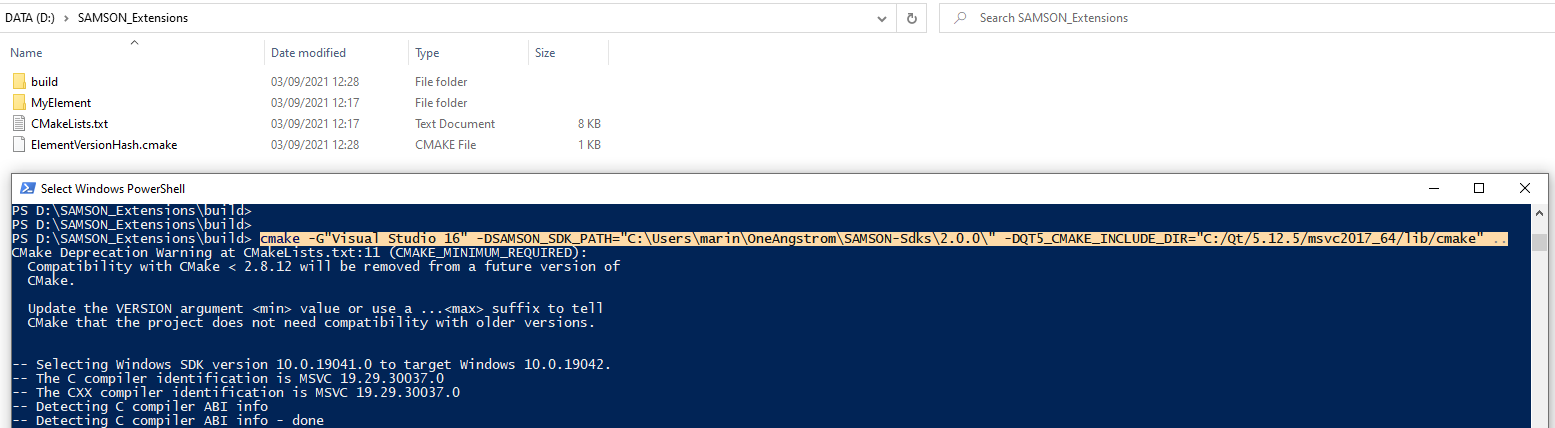
Once it is finished you should see something like this (please check if the configuration and generation were done successfully):

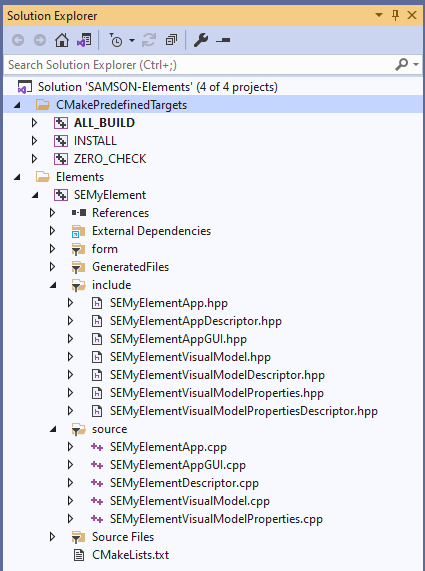
A Microsoft Visual Studio Solution .sln file should be generated in the build folder that you can open in the Visual Studio. The Solution Explorer of Visual Studio should show the structure below:
Adding files to a SAMSON Extension
You can add files to (or remove files from) your new SAMSON Extension (e.g. to add or remove classes, to wrap existing code, etc.). When you do so, you should run cmake again (or let your IDE to run it) to regenerate a project for your development environment. One simple way to do this without having to open a command window is to slightly alter the CMakeLists.txt file located in the SEMyElement (e.g. add and remove a whitespace somewhere) and save it: when building the project (see the next section), CMake will detect the changes and update the project.
Building step
Once your project is opened, you can now browse your SAMSON Extension files and edit your code. The project contains one target for your SAMSON Extension (SEMyElement), as well as some cmake-specific targets. When you generate new SAMSON Extensions with the SAMSON Extension generator in the same folder, CMake will re-generate the project files and will add new targets as needed.
You may now check that your code compiles by either building the target corresponding to it (SEMyElement) or when your solution contains several SAMSON Extensions and you want to compile them all at once, by building the ALL_BUILD target.
Note that SAMSON Extensions may be built in both Debug and Release configurations. The Debug configuration is the one you should use to develop and debug your code, while the Release configuration is the one you should use when testing the performance of your SAMSON Extension, and when uploading it to SAMSON Connect.
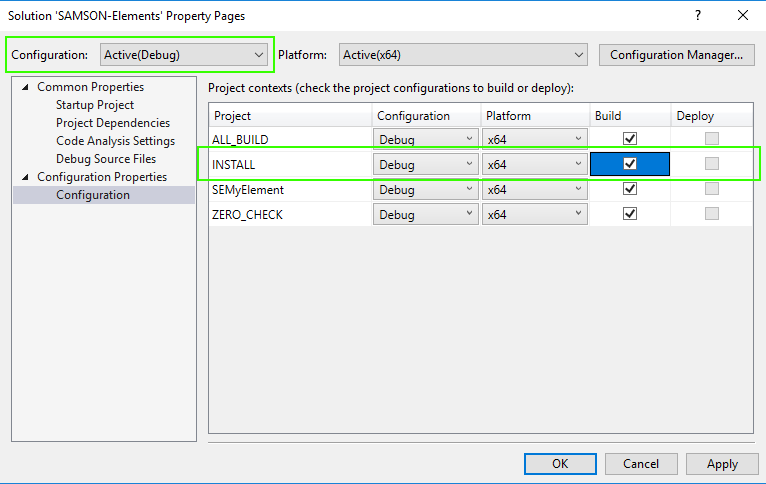
To be able to use your SAMSON Extension, it should be installed in a specific SAMSON directory to make it available in your SAMSON installation. For that, open Properties of the solution ( right click on the Solution "SAMSON-Elements" and choose Properties in the context menu); for both Debug and Release configurations, in Configuration Properties > Configuration tick the build checkbox corresponding to the INSTALL target. Building the INSTALL target will automatically compile the code if necessary.
Now you can build the INSTALL target (either in Release or Debug configurations) to install your new SAMSON Extension (building the INSTALL target will automatically build your project). If the build was successful your SAMSON Extension should be available when you launch SAMSON (for Release configuration - SAMSON-Core from SAMSON installation, for Debug configuration - SAMSON-Core from the SAMSON SDK installation). During startup, your SAMSON Extension will be loaded alongside with the SAMSON Extension you added from SAMSON Connect, as well as other SAMSON Extensions you developed.
Running SAMSON
Note that a SAMSON Extension compiled in the Release mode will be available only when launching the SAMSON-Core executable provided with SAMSON installation, while a SAMSON Extension compiled in the Debug mode will be available only when launching the SAMSON-Core executable provided with SAMSON SDK installation. SAMSON users only get the Release configuration, since this is the optimized one. The SAMSON SDK installer, though, adds a Debug version of the SAMSON-Core executable. It is this version that should be started when testing or debugging SAMSON Extensions compiled in the Debug configuration.
Let's first set the SEMyElement target as the Startup project. For that, right-click on the SEMyElement target and press in the context menu on Set as Startup project.
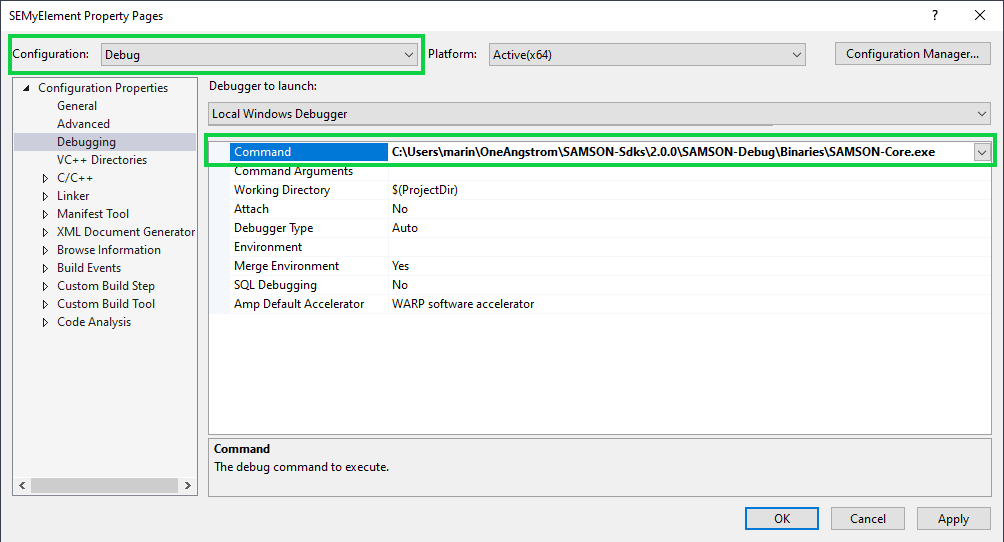
In order to let Visual Studio know which version of SAMSON to start, open the Properties of the SEMyElement target and enter the path to the SAMSON-Core executable for both Release and Debug configurations in Configuration Properties > Debugging > Command:
- for the Debug configuration indicate the path to the SAMSON-Core executable from the SAMSON SDK installation, e.g.:
C:\Users\USERNAME\OneAngstrom\SAMSON-Sdks\5.0.1\SAMSON-Debug\Binaries\SAMSON-Core.exe - for the Release configuration indicate the path to the SAMSON-Core executable from SAMSON installation, e.g.:
C:\Users\USERNAME\OneAngstrom\SAMSON-Application\5.0.1\Binaries\SAMSON-Core.exe
You may now indicate to Visual Studio that SEMyElement is the StartUp project: right click on SEMyElement in the Solution Explorer, select Set as StartUp Project in the context menu. When you start your project, with or without debugging (see the Debug menu), Visual Studio will start SAMSON.
Now you can build the solution (menu Build > Build solution or F7 or Ctrl + Shift + B ) which will build all the projects including INSTALL, and then run the StartUp project ( F5 ).