The Viewport displays visualization of structural models, visual models, some other nodes, editors and apps, and you can move around in it using a mouse, a keyboard, or the Compass in the bottom-right corner of the viewport.

The key element of visualization in SAMSON is a camera, it provides a 3D view of visualizable objects, and can be easily controlled to point to a specific location, zoom in or out, translate, rotate, etc. Basically, you may consider your screen as a camera pointing into the screen and yourself as an operator seeing through the camera.
A camera is a part of a SAMSON Document, and each Document has at least one camera. Cameras (with all their properties) are saved and loaded together with a Document.
Using the camera
A camera has three modes: rotation, translation, and zoom.
Using a mouse:
- Click on the right mouse button to rotate the view.
- Press the mouse wheel to translate the view.
- Scroll the mouse wheel to zoom in/out.
- Double-click on the mouse wheel to center the view.
- Ctrl / Cmd⌘ + Right mouse button replaces the middle button.
Using a keyboard:
- ↑ ↓ → ← - rotate the view around horizontal or vertical axis.
- Alt + → ← - rotate the view in the viewport plane around its center.
- Ctrl + ↑ ↓ → ← - translates the view horizontally or vertically.
- Ctrl + + - zoom in.
- Ctrl + - - zoom out.
- Shift + Space - center the camera on the selection or on the full view if nothing is selected.
Note: The rotation behavior slightly changes depending on whether the grid is on or off:
- When the grid is on, consider it as a table on which you rotate a system.
- When the grid is off, consider that you rotate a system that is floating free.
Rotation mode
To switch the camera into a rotation mode, press and hold the right mouse button . There are two rotation modes: close to the borders of the viewport and a trackball rotation mode (the view point is rotating around the center) in the middle part of the viewport.
Translation mode
To switch the camera into a translation mode, press and hold the mouse wheel . Try to move your mouse and you will see that the molecule follows it.
Zoom mode
To switch the camera into a zoom mode, scroll the mouse wheel : turn the wheel and the camera will zoom in and zoom out depending on the direction.
Centering
Double-click on the mouse wheel to center the view.
The Shift + Space shortcut changes the camera focus. Select an atom and press Shift + Space , this centers the camera on the selected part (so that the selection will be in focus). If nothing is selected, then the camera is centered on the full view of the molecular system (the whole molecular system in the active Document).
Tip: If you loose your molecular system, press Shift + Space and the camera will be re-positioned.
Tip: If the camera is centered on an atom and you rotate the view, the rotation will be centered around the atom.
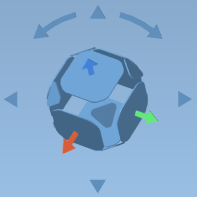
Compass
The compass is a dedicated camera controller, which is situated in the bottom-left corner of the viewport and can be shown/hidden using the menu in the bottom part of the viewport by clicking on the corresponding icon. The compass allows you to easily align the camera and rotate it around different axis.
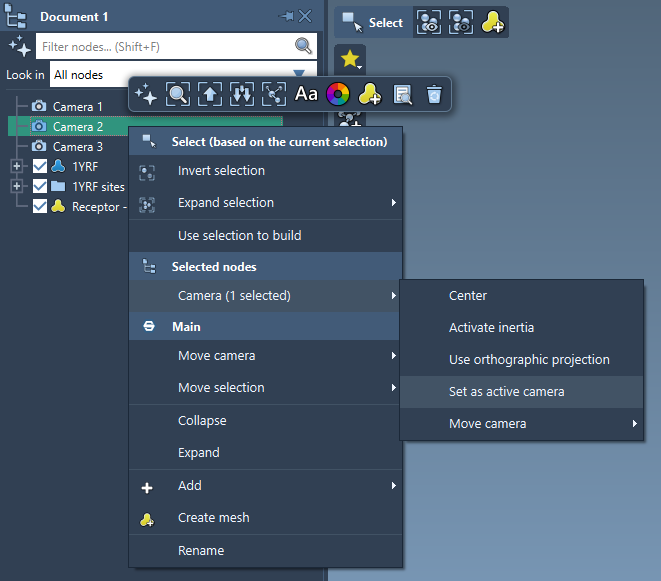
Camera functions
You can access some of the camera's functionality through its context menu. Right-click on a camera in the document view to apply some of its actions:
- center the camera on the selection or on the whole document
- activate the camera inertia which will allow for a movement with inertia
- activate the camera orthographic projection which is useful e.g. for viewing crystals
- set the camera as the active one
- move the camera
Try switching the camera inertia on and move or rotate the molecule.
Try switching on and off the orthographic projection mode.
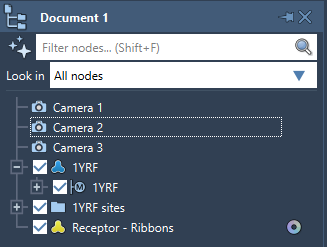
Multiple cameras
You can have multiple cameras in one Document but only one camera can be active at a time. Having multiple cameras might be useful if you want to switch fast between different views (e.g., positions, projections, close-up views, and a full view) in the same Document. To switch between cameras, double-click on one or right-click on one in the document view and in its context menu click "Set as active camera".
To add a new camera, click Visualization > Camera or use the Ctrl + Shift + C shortcut on Windows and Linux or Cmd⌘ + Shift + C on Mac. A newly added camera will have a default starting position.