

This tutorial shows you how to create a new visual model that shows the van der Waals representation of a group of atoms.
Note: SAMSON already has a Van der Waals visual model which is installed by default.
The source code for an Element created in this tutorial can be found at https://github.com/1A-OneAngstrom/SAMSON-Developer-Tutorials.
Generating an Element
We will start by creating a new SAMSON Element called VanDerWaals thanks to the SAMSON Element generator (please, refer to the SAMSON Element generator tutorial for a reminder on how to use it):
- launch SAMSON and run the SAMSON Element generator;
- specify the path to a folder where you want to develop your SAMSON Elements;
- name the SAMSON Element as VanDerWaals and add some description;
- add a Visual Model class (called
SEVanDerWaalsVisualModel); - generate the SAMSON Element.
The SAMSON Element generator generates a visual model class (derived from the SBMVisualModel class) and a property widget class for the visual model.
Now, try building the SAMSON Element.
Setting up the visual model
A visual model is applied to a group of nodes passed to the constructor of the visual model. Since we want to apply a van der Waals visual model to a group of atoms, we add a member to the visual model to remember the list of atoms that we were passed.
Open the SEVanDerWaalsVisualModel.hpp file and include the SBAtom.hpp header:
And add the following member inside the declaration of the SEVanDerWaalsVisualModel class in the SEVanDerWaalsVisualModel.hpp file:
A pointer indexer is similar to a node indexer, thus assigns indices to pointed objects, but automatically removes references from the indexer when a pointed object is deleted (in the C++ sense) so that it can never point to deleted memory.
Then, in the SEVanDerWaalsVisualModel.cpp file, modify the second constructor as follows:
First, we collect atoms among the nodes passed to the constructor of the visual model (possibly among their descendants), then we add the atoms to the atom indexer atomIndexer.
Disabling the property window
The property window of a visual model is mainly used to display the possible parameters of the visual model to the user such that they can be modified.
Note: This is also can be done via the introspection mechanism by exposing visual model attributes. In this case they could be modified via the Inspector.
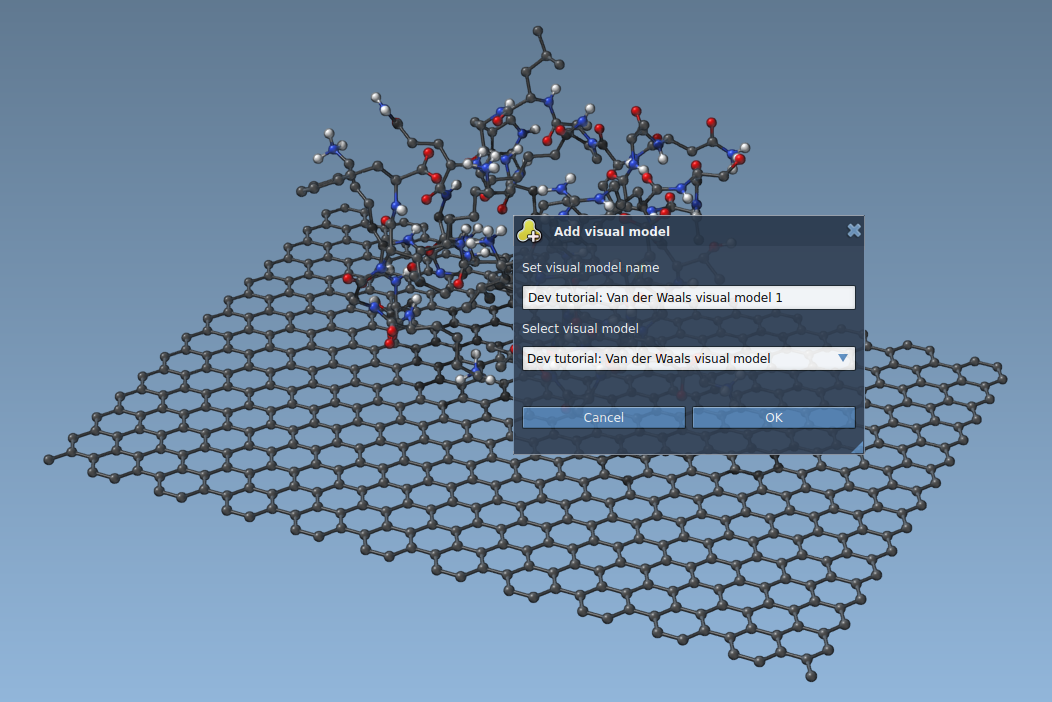
If enabled, the property window appears when the visual model was created or can be invoced from the context menu of the visual model node in the data graph. For simplicity, in this tutorial we will not be using the property window. To disable the property window, please open the SEVanDerWaalsDescriptor.cpp file that describes the SAMSON Element and comment the following string:
You can also change the SAMSON Element category to Visualization:
Displaying spheres
To display something in the viewport, we overload the display function of the visual model. For convenience, SAMSON provides many functions to ease rendering objects (instead of having to use OpenGL functions).
In this tutorial, we are going to use the displaySpheres function, to draw one sphere per atom, with a radius equal to the van der Waals radius of the atom.
Let's now code inside the display function of the visual model.
First, we allocate arrays needed to transfer data to SAMSON for rendering spheres and initialize them to zeros:
Observe the different array sizes above: we need 3 float per atom for the position, 1 float for the radius, 4 float for the color (red, green, blue, and opacity), and 1 unsigned int for flags used to alter the rendering colors (e.g. the selection flag and the highlighting flag).
We also need to know whether a color scheme is applied to the visual model, so we retrieve the pointer to the material applied to the visual model:
We can now fill the arrays by traversing the list of atoms:
Here, first we check whether the atom has been deleted or not. Thus, we will display spheres only for atoms, present in the data graph.
Then, we fill the position array and the radius array based on atom's position and the van der Waals radius, respectively. Both physical quantities have length units (SBQuantity::length), so we extract their numerical value with the getValue function, and cast the resulting double as a float, which is expected by the renderer.
Then, we fill the color array based on the material applied to the visual model, if any. Precisely, if a material is applied to the visual model, we charge it of filling the color array, based on the current atom we’re examining. Else, we check whether the atom itself has a color scheme in order to use it. Else, we set the color to white (red, green, blue and opacity are set to their maximum value: 1.0f).
Finally, we fill the flag array based on an “or” combination of the flags of the visual model and the flags of the current atom, to help the user have visual feedback when nodes are highlighted or selected.
We can now ask SAMSON to display these spheres:
And we complete the display function by cleaning up memory:
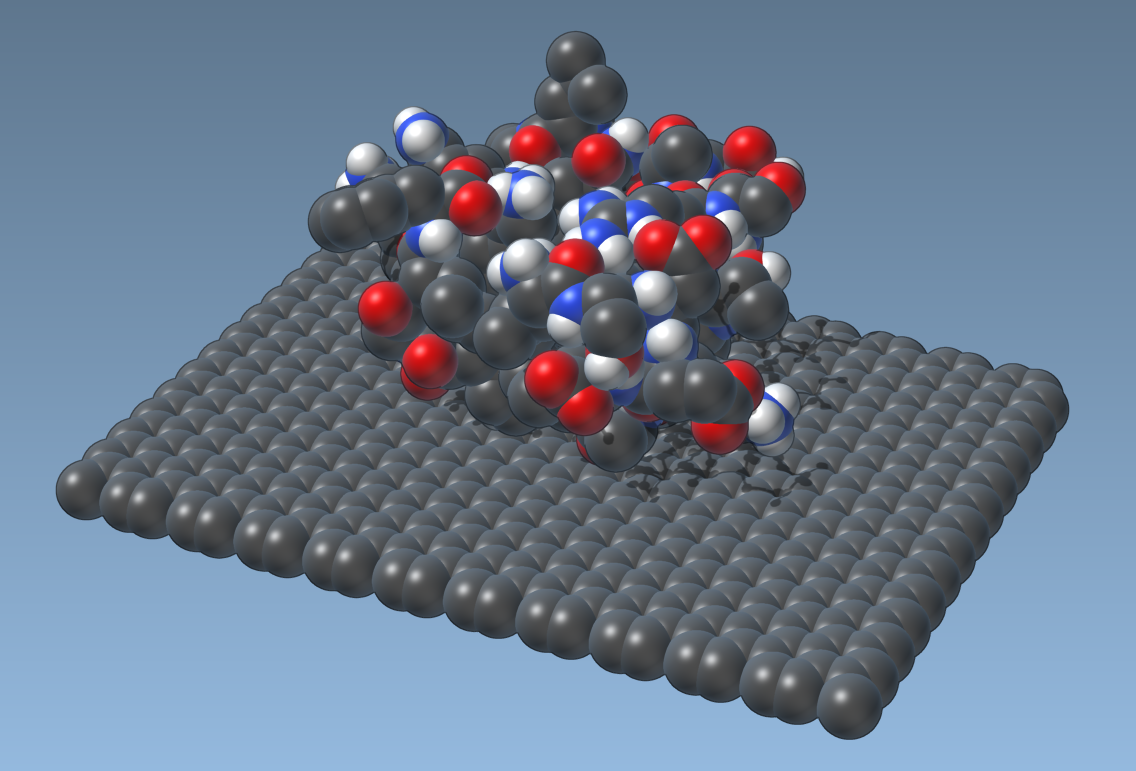
Now, if you build and launch SAMSON, and apply this visual model ( Ctrl/ Cmd⌘ + Shift + V) to a molecule without any material applied, it will show white spheres. Let's make it more appealing with default color set based on the CPK color scheme. For that, add the <SBElementTable.hpp header file in the SEVanDerWaalsVisualModel.cpp file:
and change the setting of the default color to the following line:
Here we get the CPK color for a current atom element type.
Now, if you build and launch SAMSON, and apply this visual model to a molecule without any material applied:
it will show spheres with CPK color:
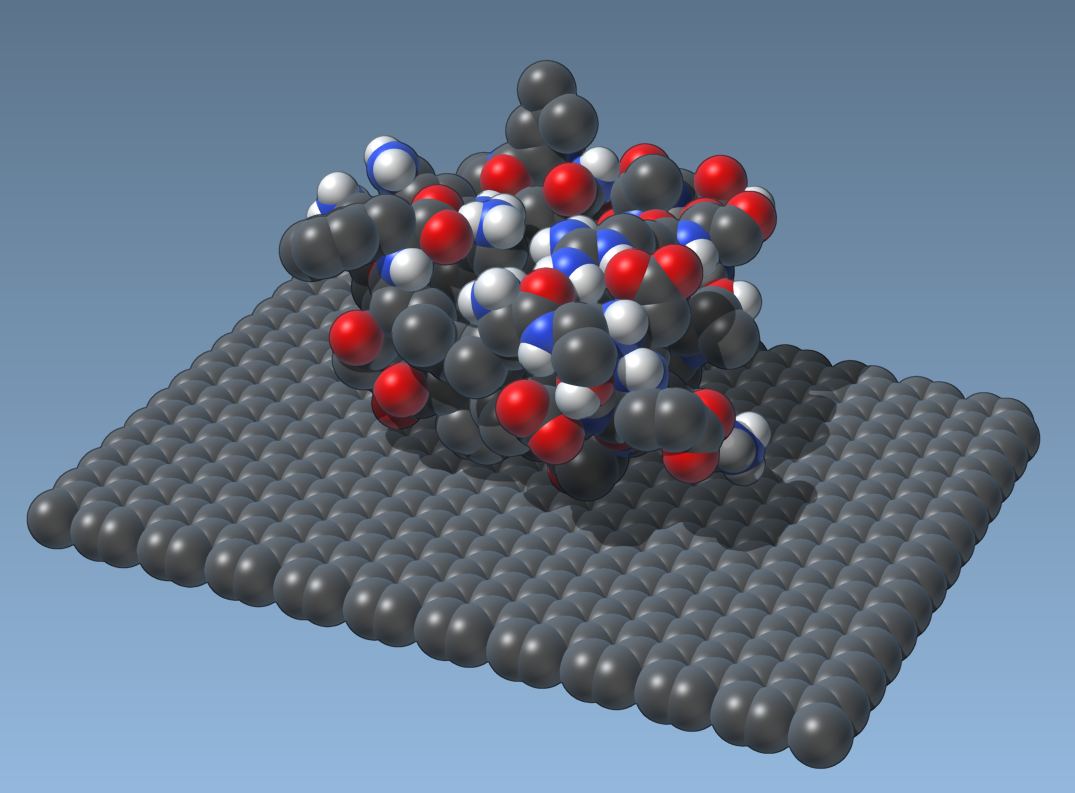
You can see that the visual model does not cast any shadows, and the only the shadows you see are casted by the molecule itself. Learn how to make you visual model to cast shadows in the next section.
Casting shadows
SAMSON uses a shadow map algorithm in order to render shadows. This algorithm performs a hidden rendering pass from the point of view of the light and uses this render to determine whether a point is shadowed during the main rendering pass. In order to cast shadows, we thus need to render spheres again, but in the displayForShadow function. For faster results, we could avoid sending colors to SAMSON, since the shadow pass only cares to render geometry and determine the depth of objects. For simplicity, however, we can just call the display function from the displayForShadow function:
The visual model then casts shadows:
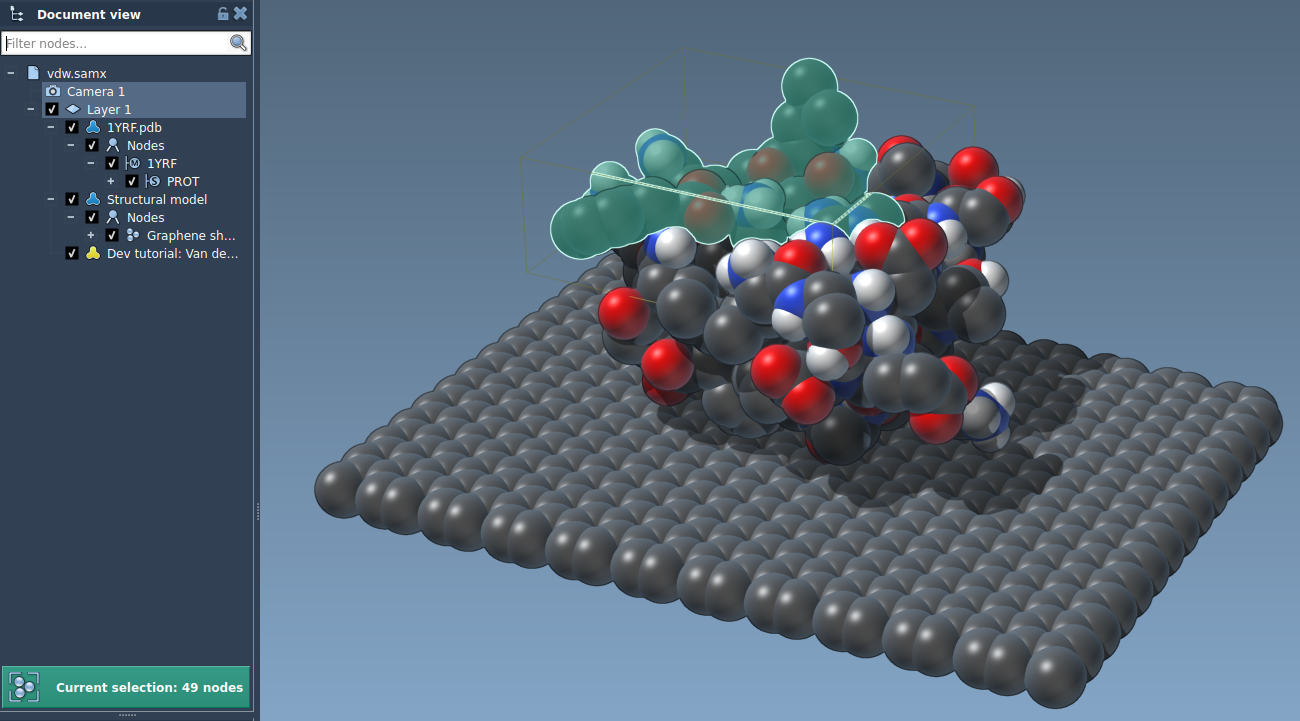
Enabling selection
In SAMSON, picking objects in the viewport is also implemented with rendering functions. However, instead assigning colors to each pixel of the viewport, we assign the index of the node being rendered at this location. Visual models can thus become selectable if they implement the displayForSelection function:
This function is shorter than the display function since we do not have to deal with colors. The main difference is that we fill the index array with the unique node index that SAMSON has assigned to the atom. As a result, when the user attempts to pick a sphere in the visual model, the atom is selected:
Modifying the properties
Let's now make it possible for the user to change the size of the spheres.
For that we introduce a dimensionless variable radiusFactor in the SEVanDerWaalsVisualModel class (file SEVanDerWaalsVisualModel.hpp) together with according getter and setter functions:
And implementation of these functions in the SEVanDerWaalsVisualModel.cpp file:
In the second constructor of the SEVanDerWaalsVisualModel class (file SEVanDerWaalsVisualModel.cpp) we set the default value for the radius factor to 1.0:
And in both display and displayForSelection functions of the visual model modify the computation of the sphere radius by multiplying by the radius factor:
There are two main ways to provide a possibility for the user to modify properties of the visual model:
- via the Inspector;
- via the property window of the visual model.
You can use either one of them or both.
Inspector
Now, we expose the radius factor as an read and write attribute thanks to the getter and setter functions and the introspection mechanism. Note that the getter and setter function names should differ only in the get and set parts. Open the SEVanDerWaalsVisualModelDescriptor.hpp file and add the following attribute exposure:
Here, we specify the type of the attribute (const float&), the class, the root name of the getter and setter functions, the description of the attribute, and an attribute's group (a group box in the Inspector window where this attribute will be placed).
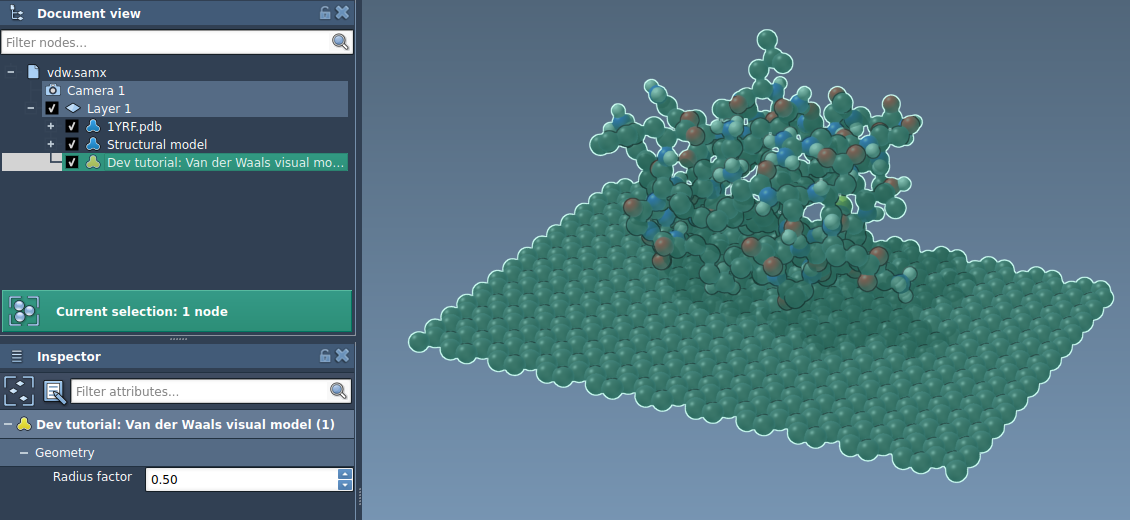
Now, the user can modify the radius factor in the Inspector when the visual model is selected:
Property window
First, if you disabled the property window of the visual model, enable it back by uncommenting the following string in the Element's descriptor file (SEVanDerWaalsDescriptor.cpp):
Open the SEVanDerWaalsVisualModelProperties file, modify the default label, and add a QDoubleSpinBox. Rename this spin box to doubleSpinBoxRadiusFactor and set its parameters as on an image below (the defaul value to 1.0 and the minimum to 0.0):

Add a slot onRadiusFactorChanged(double):
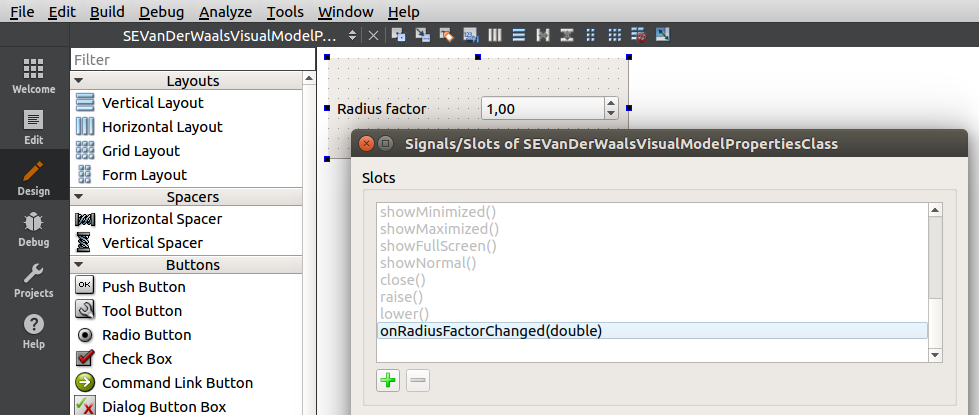
And connect the valueChanged(double) signal of the spin box to this slot:

Now, add this slot in the SEVanDerWaalsVisualModelProperties class declaration (SEVanDerWaalsVisualModelProperties.hpp file):
And its implementation in the SEVanDerWaalsVisualModelProperties.cpp file:
Here, we set the radius factor of the visual model from the property window and request to force the update of SAMSON's viewport which will render the viewport thus rendering the visual model with new parameters.
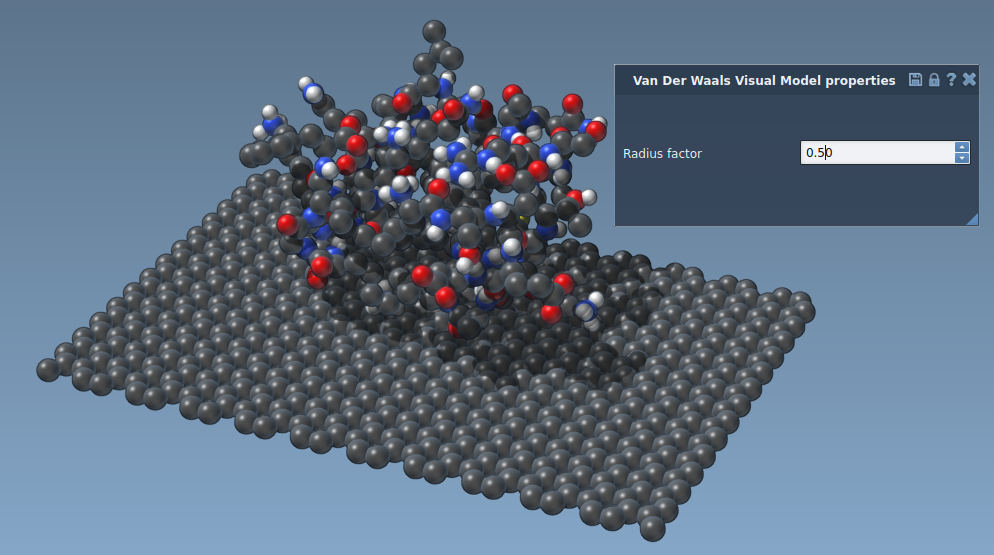
Now, the user can modify the radius factor in the property window and it will automaticaly update the visual model representation:
Serializing the visual model
If you want for your visual model to be copyable and savable it is necessary to implement its serialization. Serialization is used in SAMSON to:
- copy nodes in the data graph,
- save documents in SAMSON format files (.sam, .samx) and further load it from them.
Please, see the Serialization section for more information.
By default, the newly created visual model is not serialized.
Open the SEVanDerWaalsVisualModel.cpp file and modify the isSerializable function to return true.
This indicates to SAMSON that this class is serializable.
Now, we need to re-implement both serialize and unserialize functions.
When SAMSON serializes a group of nodes, it proceeds in two passes:
- First, all nodes that are to be serialized are added to a
nodeIndexer. This way, each node that's about to be serialized has an index. It's those indices that need to be used to indicate which nodes are referenced by other nodes if the referenced nodes are serialized as well, else we need to use addresses of the referenced nodes. - Then, the
serializefunction of each node is called. This function receives thenodeIndexer.
During unserialization, SAMSON also proceeds in two steps:
- First, it creates all required nodes and indexes them in a
nodeIndexer, in the same order as during serialization. - Then, the
unserializefunction of each node is called. This function receives thenodeIndexer.
The serialize function allows for serialization of your visual model.
First we invoke the serialization function of the parent class. The parent functions do many things (all the way up to SBNode itself, i.e. SBVisualModel::serialize calls SBModel::serialize which calls SBNode::serialize) and are needed for correct saving and loading of node properties. This allows to save the node's name, visibility flag, a material, etc. Then we save information on our visual model itself: the radius factor, number of nodes to which the visual model is applied (nodes referenced by the visual model), and the indices of these nodes in the nodeIndexer or their addresses. For the last part, we check whether the atom itself was serialized or not. Basically, saving of the document leads to the serialization of every node that can be serialized, while copying leads to the serialization only of the copied nodes. If the atom was serialized we save its index in the nodeIndexer, else we save the atom's address.
The unserialize function allows for unserialization of your visual model.
First, we invoke the unserialization function of the parent class. This will create the node in the data graph. Then we read information on our visual model itself: the radius factor, number of nodes to which the visual model is applied (nodes referenced by the visual model), and the indices of these nodes in the nodeIndexer or their addresses. We check whether the atom itself was serialized or not. If the atom was serialized we read its index in the nodeIndexer, else we read the atom's address.
This code allows us to both copy the visual model in the data graph and save it in SAMSON format files or load it from them.