

SAMSON provides a powerful and easy way to create presentations, animations, and movies. Animation capabilities in SAMSON include but are not limited to:
- animations of molecules: dock structures, assemble structures, create custom paths, play simulation trajectories;
- camera animations: orbit around structures, add standard paths, create custom paths;
- various animation effects: entrance, exit, highlight, etc.
Note: In the movie we use the Animation menu which is no longer present in SAMSON - you can access all animations via the Animation panel and all presentation actions via the Animator's controls.
See also: Visualizing, Colorizing, Rendering using Cycles, Visual models, Visual presets
Video tutorial
A video tutorial with introduction into animating with SAMSON: How to create molecular animations in SAMSON (1 h 11 min).
Note: In the movie we use the Animation menu which is no longer present in SAMSON - you can access all animations via the Animation panel and all presentation actions via the Animator's controls.
What is a presentation
A Presentation is a node that combines Animation nodes helping you to form a story and show presentations or export them as movies.
Presentation and animation nodes are part of documents and are visible in the document view.
A document might contain multiple presentations, each one of them containing multiple different animations. Presentation and animation nodes are saved with a document, which means that you can easily save, load, and share your presentations and animations. You can check for some shared documents with presentations and animations on SAMSON Connect - Documents where users can share their documents.
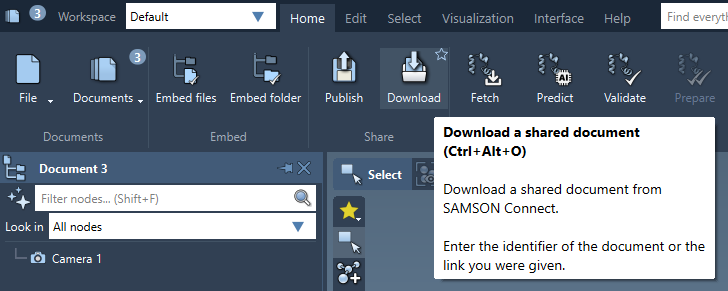
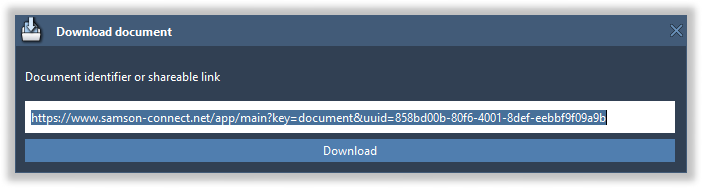
Let's see an example - we will try one of the presentations shared on SAMSON Connect - Documents: https://www.samson-connect.net/app/main?key=document&uuid=858bd00b-80f6-4001-8def-eebbf9f09a9b. Copy this link and, in SAMSON, click on Home menu > Download ( Ctrl / Cmd⌘ + Alt + O ):
And paste the link in the pop-up dialog:
In a moment, it will download this shared document into your SAMSON. Double-click on the Presentation node in the document view and it will open the Animator. Now, click Space to start and stop the presentation or use the animator's controls on the top-center of the animator.
Let's first briefly see what the Animator consists off and then we will see how to create presentations.
Animator
The Animator makes it possible to create, edit, and play presentations, and export them as movies.
To open the Animator, go to Interface menu > Animator or press Ctrl / Cmd⌘ + 7 , or if you already have a presentation in the document simply double-click on it.
When no presentation is opened in the Animator, it looks as follows:
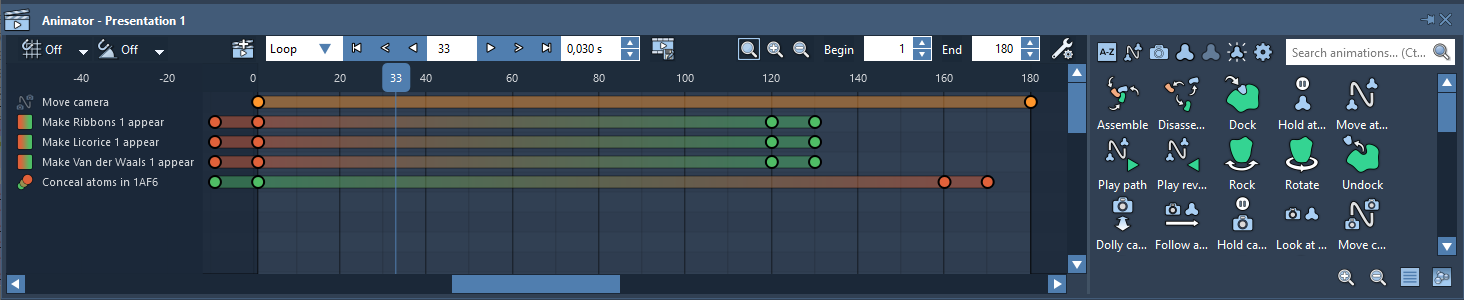
If you open a presentation in the Animator you should see the Track view populated with tracks of animations that are part of the presentation. Let's see in detail what the Animator consists off.
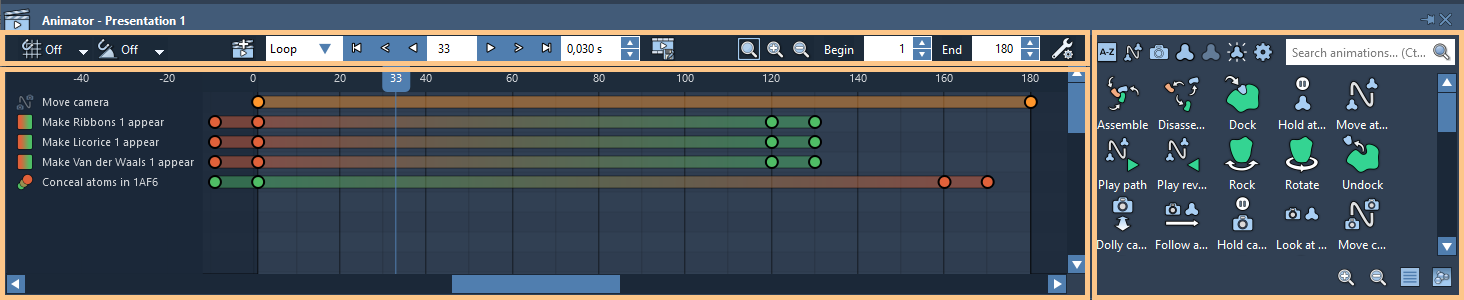
Controls
In the top part of the Animator, you can find its controls (from left to right):

- grid and angle snapping govern how some animations related to movements operate
- presentation controls: play mode (Once, Loop, Bounce), go to the beginning, go to the previous frame, play back, the current frame, play forward, go to the next frame, go to the last frame, frame duration in seconds
- fit in the Track view with animation tracks; zoom in/out on animation tracks
- the begin and the end frames of the presentation
- global presentation preferences, see Presentation options
Track view
In the central part of the Animator, you can see the Track view with animation tracks. When a presentation is being edited in the Animator, its animations are visible in the Track view. Each animation corresponds to a track, and may be composed of one or more keyframes (represented as circles on the track), i.e. key events that happen at specific frames of a presentation. Different types of animations have different colors of tracks to make it easier to distinguish between them.
The number of keyframes depends on the animation itself. For example, for some animations, there are only two keyframes showing the first and the last key event of the animation, basically, where the animation starts and ends.
Animation panel
In the right part of the Animator, you can find the Animation panel with a list of available animations which are split into six categories (you can switch between them using buttons in the top part):
- Motion animations: for docking, assembling, etc.
- Camera animations: orbit, custom paths, etc.
- Entrance effects: appearing, showing, etc.
- Exit effects: disappearing, hiding, etc.
- Highlighting effects: e.g. pulsing effects
- Other animations: e.g. to pause and stop a presentation, as well as to change backgrounds and display background images such as presentation slides
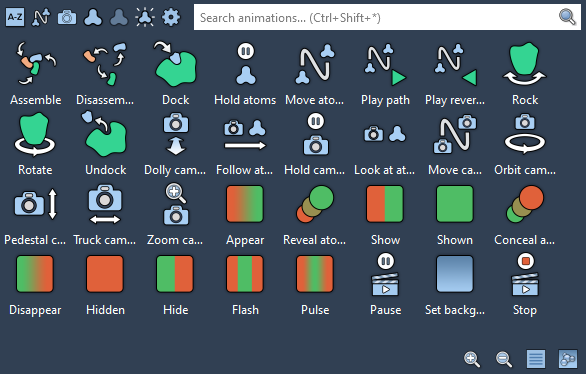
The buttons on the bottom of the Animation panel allow you to change the view of the animation list: zoom in, zoom out, switch between the list and image views. You can also search for animations using the search box on the top of the Animation panel.
Preview
The Animator allows you to easily preview the impact of your design decisions by letting you interactively choose the current presentation frame either using the controls in the top part of the Animator or by choosing the frame directly in the Track view.
Adding a presentation
You can add a presentation via the Visualization menu > Add > Presentation. This will also open the Animator. Or, open the Animator and simply double-click in it on an animation you want to add to the presentation.

You should see a new presentation node added in the document.
For a newly added presentation, the Animator shows an empty animation track view where you can add animations. By default, the duration of the presentation is set to 180 frames. You can modify the duration of the presentation but the maximum number of frames is limited depending on the Plans.
The Animator provides you with an access to all animation capabilities including the creation of a presentation, saving movies and frames, and adding animation effects.
Animations
SAMSON provides a wide variety of animations making it easy to create complex animations, presentations, and movies. Different animations act on different objects - some act on cameras, some act on nodes like structural models, visual models, meshes, and labels.
The animations are split into the following categories:
- Motion animations : for docking, assembling, etc.
- Camera animations : orbit, custom paths, etc.
- Entrance effects : appearing, showing, etc.
- Exit effects : disappearing, hiding, etc.
- Highlighting effects : e.g. pulsing effects
- Other animations : e.g. to pause and stop a presentation, as well as to change backgrounds and display background images such as presentation slides
The animations can be found in the Animation panel of the Animator :
Animations are applied in correspondence with their order in the presentation as seen in the document. This means that if you have, for example, several camera animations at the same frame then they will be applied consecutively and the state of the camera will correspond to the last camera animation applied at that frame. You can always changed the order of animations in a presentation - simply use the drag-and-drop mechanism.
Motion animations
- Assemble and Disassemble - animate assembling of systems.
- Dock and Undock - animate docking.
- Hold atoms - hold atoms positions fixed between two frames.
- Move atoms - make atoms move freely; the animation will interpolate between the positions of the atoms to which the animation was applied.
- Rock - make a group of particles rock around its geometric center.
- Rotate - make a group of particles rotate around its geometric center.
- Play path and Play reverse path - animate one or more trajectories.
Note: If you use motion animations, then, preferably, for the structural nodes to which motion animations were applied you should also apply the Hold atoms animation at frames where no motion animations other than the Hold atoms animation are used. This is optional but might be necessary because positions of structural nodes can be changed when working with the document or when switching between frames of the presentation. It will ensure that these structural nodes have proper positions along the presentation.
Camera animations
- Dolly camera - a dolly effect, i.e. zoom the camera between two frames with changing the camera's target point.
- Follow atoms - continuously follow the specified atoms. Both the camera target and the camera position move in order to preserve a constant distance between the camera and the atoms.
- Hold camera - fix the camera at the certain position. Use this if you don't use other camera animations at some frames and you would like to have a certain view since the view can be changed while working with the document.
- Look at atoms - continuously look at the specified atoms. Only the camera target moves while the camera position does not change.
- Move camera - create custom camera paths.
- Orbit camera - orbit around a system.
- Pedestal camera - move the camera vertically between two keyframes (in the camera reference frame).
- Truck camera - moves the camera horizontally between two keyframes (in the camera reference frame).
- Zoom camera - zoom the camera between two frames.
Note: Preferably, you should always have some camera animation at each frame to specify the camera position because the camera position can be changed when working with the document. If you don't need to use any advanced camera animations then just use the Hold camera animation to have a defined static view of your system. This will ensure that the active camera has proper positions along the presentation.
Entrance and Exit effects
- Appear and Disappear - make nodes progressively appear or disappear; can only be applied to nodes with the transparency attribute, e.g. structural nodes, visual models, meshes, and labels.
- Reveal atoms and Conceal atoms - make atoms appear or disappear progressively between two frames.
- Show and Hide - show or hide nodes at the current frame.
- Shown and Hidden - make nodes shown or hidden between two frames.
Note: Preferably, to make sure that all the nodes are shown/hidden as expected at each frame, you should always specify what nodes should be shown or hidden at frames where no other Entrance, Exit, or Highlighting effects are applied to those nodes. This is optional but might be necessary because the visibility or transparency of nodes can be changed when working with the document or when switching between frames of the presentation. It will ensure that these structural nodes have proper visibility along the presentation.
Highlighting effects
- Flash - make nodes appear at the begin keyframe and disappear at the end keyframe by changing their visibility.
- Pulse - make nodes progressively appear then disappear by changing their transparency. It can only be applied to nodes with the transparency attribute, e.g. structural nodes, visual models, meshes, and labels.
Other animations
- Pause - pause the presentation at a given frame for a given number of seconds which can be specified in the Inspector.
- Stop - stop the presentation at a given frame. To resume the presentation press Space or the Play button in animator's controls. You can use this, for example, to subdivide your presentation into slides.
- Set background - set background between two frames; you can also display background images such as presentation slides.
Please see the Animations section for the description of animations available in SAMSON.
Adding animations
Let's now create some animations. If you would like to repeat the steps below, load 1AF6 molecule using Home menu > File > Fetch which will download it from RCSB PDB. Then apply a Ribbons (secondary structure) visual model to it.
Let's see, for example, how to add the Orbit camera animation. First, position the camera in the plane in which you want it to be rotated around the object. Note, that the rotation plane will be defined differently whether you have the grid switched on or off. You can later adjust the rotation plane using the animation controllers. Then, double-click on the Orbit camera animation effect in the Animation panel of the Animator.
By default, camera animations are applied to the active camera. How the camera animations behave also depends on whether you have the grid in the viewport or not. Those options can be changed in the Inspector for each camera animation.
Note: In the movie we use the Animation menu which is no longer present in SAMSON - you can access all animations via the Animation panel and all presentation actions via the Animator's controls.
You can click on play or change the frames in the Track view to see how the presentation would look like.
All the camera animations have specialized camera controllers allowing for fine positioning of the camera: the central point, camera orientations, etc. In the viewport, you can see the associated keyframe numbers shown near the keyframe camera animation controllers. Let's see, for example, how can the Orbit camera positioning be adjusted. Note, if you don't see the camera controllers, you might need to zoom out in the viewport (use the mouse scroll button or press Ctrl / Cmd⌘ + - ).
While editing camera positions, Thumbnails automatically appear at the bottom of the viewport to help you frame the best shots. Thumbnails are shown for the currently modified keyframe and for the next and previous keyframes (if any) of the currently modified camera animation. Let's see how it looks like with an example of the Move camera animation.
Animations have various options that can be changed in the Inspector. For that, select an animation in the document view and open the Inspector ( Ctrl / Cmd⌘ + 2 or Interface menu > Inspector).
Let's now make the structural representation of the molecule progressively disappear during the presentation. For that, first, select the structural model in the document view, then double-click on the Disappear animation effect in the Animation panel of the Animator.
Note: In the movie we use the Animation menu which is no longer present in SAMSON - you can access all animations via the Animation panel and all presentation actions via the Animator's controls.
You can move the animation's keyframes in the Track view to alter the animation's behavior. Simply select them and move as shown above.
Let's now make the Ribbons visual model progressively appear during the presentation. For that, first, select the Ribbons visual model in the document view, then double-click on the Appear animation effect in the Animation panel of the Animator.
Editing a presentation
To view and edit a presentation in the Animator, double-click on the presentation in the document view or press Edit presentation in Animator in its context menu. You can view and edit in the Animator only a single presentation at a time.
To change the order of animations within a presentation, move them using the drag-and-drop mechanism directly in the document view.
To delete an animation from a presentation, right-click on the animation either in the Animator or in the Document view and, in the context menu, click "Erase".
Animation controllers
Some camera and motion animations (e.g., Move camera and Move atoms animations) have their controllers shown in the Viewport. You can hide/show those controllers by checking/unchecking this animation in the Document view or by right-clicking on it and, in the context menu, clicking "Hide/Show animation controllers".
See Adjusting camera positions on how to use camera animation controllers to adjust camera positions.
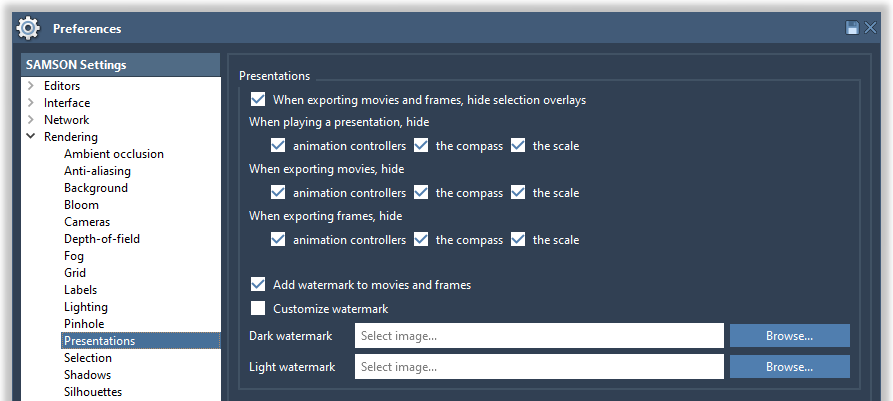
By default, when playing a presentation or exporting it in a movie or in frames the animation controllers will be hidden - you can modify this in Preferences > Rendering > Presentations.
Adjusting camera positions
Most of the camera animations have specialized camera controllers allowing for fine positioning of the camera: the target point, camera orientations, etc. In the viewport, you can see the associated keyframe numbers shown near the keyframe camera animation controllers. Let's see how it looks like with an example of the Move camera animation. Note, if you don't see the camera controllers, you might need to zoom out in the viewport (use the mouse scroll button or press Ctrl / Cmd⌘ + - ).
While editing camera positions, Thumbnails automatically appear at the bottom of the viewport to help you frame the best shots. Thumbnails are shown for the currently modified keyframe and for the next and previous keyframes (if any) of the currently modified camera animation.
Easing curve
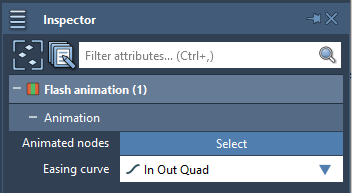
Some animations have parameters that specify the rate of change of some parameters along the animation which are governed by easing functions. In that case, you can choose which easing function/curve will be used. You can check the https://easings.net web-page to see how easing functions change a parameter over time - hover above an easing function to see how it changes.
Setting a watermark
Depending on the Plans, SAMSON provides the possibility to remove the SAMSON watermark and set your own watermark. You can do it in the Presentation options.
You can also change the background and set images as the background in Preferences > Rendering > Background or using the Set background animation if you would like to switch between various backgrounds in the presentation.
Exporting a movie
SAMSON provides the possibility to save the presentation into a movie. To do so, click on the Save movie button in the Animator. In the Save as... dialog, choose the movie format (mp4, gif, webm) and where to save it.
The way the movie will be saved might depend on the global Presentation options.
Presentation options
Presentations have a number of global rendering options that can be accessed and modified via Preferences > Rendering > Presentations or by clicking on the settings button in the top-right corner of the Animator.
Examples
See more examples in What's new in SAMSON 2021.
Some examples of presentations available on SAMSON Connect - Documents:
- 1AF6 - Fly around - uses Move camera, Appear, and Conceal atoms animations
- 1AF6 - Fly around - 2 - uses Move camera, Appear, Disappear, and Conceal atoms animations
- 1AVX - Orbit around assembly - uses Assemble, Appear, and Orbit camera animations
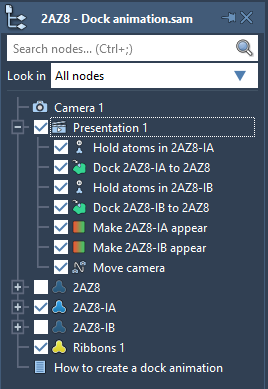
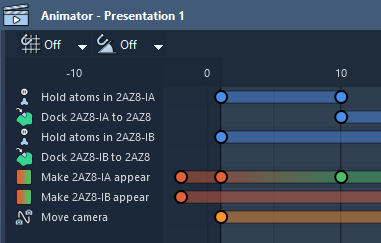
- 2AZ8 - Dock animation - uses Dock, Hold atoms, Appear, and Move camera animations
- 2BRD - Rock animation - uses the Rock animation
- 2XQ6 - Assemble animation - uses Assemble, Hold atoms, Appear, Disappear, and Move camera animations
- 5SAT - Dock animation - uses Dock, Hold atoms, Appear, Disappear, Move camera, and Hold camera animations
- Multi-walled nanotube animation - uses Move atoms, Appear, Disappear, Move camera, and Hold camera animations
- Nanotube - Keyframed animation - uses the Move atoms animation
- NU1000 (CCDC-1580411) - Fly around - uses Orbit camera and Move camera animations